We’re excited today to have fully launched our visual workflow editor. The visualisation tool had crept into the system about a month ago, as of today the tool can handle the majority of key workflow configuration tasks, vastly simplifying the config process.
What’s the main benefit?
The main benefit to users is that you can now fully create a workflow in the visual workflow editor, on a single screen, you no longer need to jump between the elements tab (to create a stage) and the routes tab (to link the stages together). It is vastly simpler which should improve the experience for both our existing superusers and anyone trialling Glide and looking to learn the key concepts.
The creation of new stages is now, where required, an automatic consequence of creating a step. To the end user it is a single button click and pop up to complete.
When adding a new step or editing an existing step you’ll see a new option for the to stage which is labelled Create new stage. If you choose this then, in addition to creating the step, the system will also create the new stage. The system asks you to confirm which two stages it should sit between (for order value purposes) and will automatically detect the order value and stage group.
You then simply need to create one or more steps going from this stage so you can join it up, or in the case of a new workflow system – continue until you reach the completion stage.
Switch to visual
The switch to a visual representation of the workflow is really important. As you are configuring workflows you can instantly see a logical representation of what you have achieved so far, any omissions or errors are obvious.
Equally important is the ability to share the visual with colleagues. Bring up the visual on a large screen in the boardroom and you can talk colleagues through what you have configured, perhaps progressing a job in another tab, rest assured their comprehension will be vastly better than if you were showing them the older text based editor.
What else has changed?
- When you create a job field or deadline (for now this is still initiated on the elements tab) the system automatically adds the new elements to all routes. You can remove it from any that you do not want it to be on.
- The routes and elements tabs are now sub-system specific. If you have a multi sub-system workflow then each sub-system will have a routes and elements tab. This just makes it easier to see what you are editing and avoids having too many routes on the routes tab. (Also means you don’t have to keep choosing a sub-system when adding anything)
- The routes tab shows 1 route at a time with a drop down to select.
- The custom client fields get a dedicated tab – this is because they are not sub-system specific.
- The job stage groups now sit at the bottom of the elements tab(s). They also span all sub-systems; however, are edited less often so we felt did not warrant a dedicated tab.
- The stages list on elements tab now shows the milestone achieved and stage description to make it easier to understand.
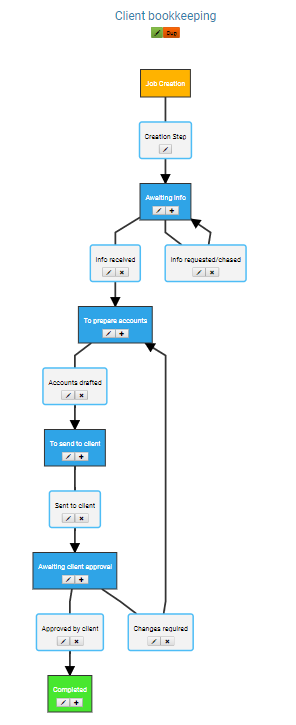
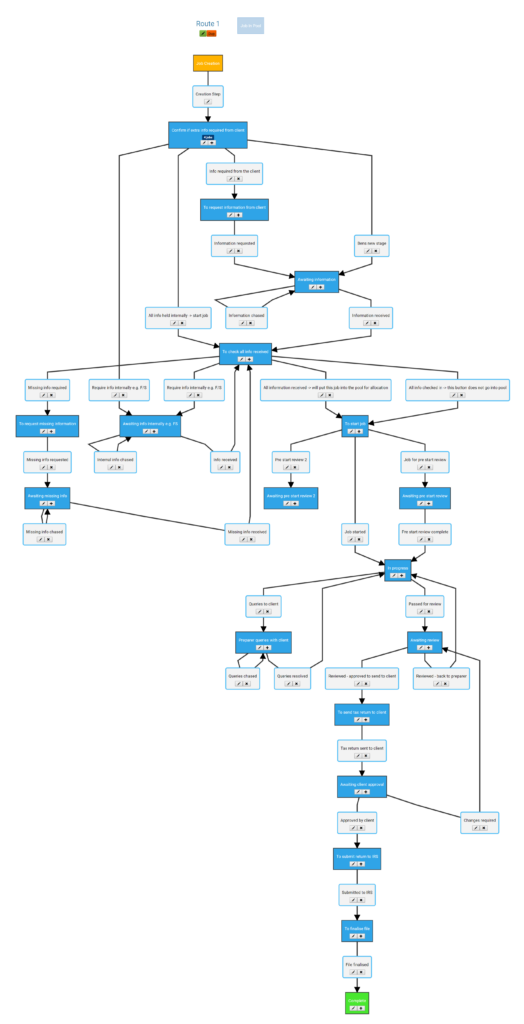
Here’s a couple of example screenshots:
First a nice simple one…..
and something a bit more complex…..
You can see the new visual editor on our Vimeo channel too.
